for perspective art students (Sophomore)
http://scholars.parsons.edu
Monday, October 6, 2014
Wednesday, April 9, 2014
19A: Draw out your last name in Illustrator --- 19 B. learn about Minus Front and Divide in Pathfinder
start with the BASIC RGB artboard (canvas)
Draw out the options both line and shape tool offers....
Use the line segment or the arc tool to create your the letters... you have to come up with your own way of drawing 2D.
draw rectangles to equate the number of letters in your LAST Name...
Have fun!
*****************************************************************
19 B- preparation for phone project... Create a handout for yourself to use on the Test..
Friday, March 21, 2014
13: Mimicking the Change one thing POSTER - Oct 23,2014
After you updated #11 #12 on your BLOG with a NEW POST....
http://tzs11.blogspot.com/2013/10/13-change-one-thing-poster.html
sample work from former student Yeiny Moreno

http://tzs11.blogspot.com/2013/10/13-change-one-thing-poster.html
sample work from former student Yeiny Moreno
Thursday, March 20, 2014
12: Texture with layer mode on Tutorial Board.net
Due 10-22-14
Boys find a suit picture.
Girls find a dress.
then a picture of some type of texture.
save and open both in Photoshop
then follow instructions on
http://www.tutorialboard.net/texture-layer-modes/
then expand (use Canvas size) to set it as before and after. send final JPG to complete assignment.

Monday, March 17, 2014
11: Flyer made with Photoshop skills Due10-21-14
Open a NEW file either 7" x 5" or 5"x 7" depending if you want a vertical or horizontal orientation. 100dpi
remember the slip of paper you filled out 2 weeks ago with the club you are currently in.
create a GRADIENT BACKGROUND...
then answer the
WHO
WHAT
WHEN
WHERE
WHY
write then out in the 4 different text styles we learned from 1st marking period.
add a graphic to finish.
remember the slip of paper you filled out 2 weeks ago with the club you are currently in.
create a GRADIENT BACKGROUND...
example
then answer the
WHO
WHAT
WHEN
WHERE
WHY
write then out in the 4 different text styles we learned from 1st marking period.
add a graphic to finish.
2nd Marking Period: moving your slides to an ONLINE BLOG with Blogger.com
before we Post anything on the web... be aware of any information that you
DO NOT want to share.
Sign in to GMAIL then goto Blogger.com
Follow direction to sign up your Blog acct.Title: “Your name” Multimedia Portfolio
Upload your (17 slides) JPEG FOLDER from your Powerpoint
and send me your blog link …
That’s
it!
We start Marking Period 2 on Thursday 10-16-2014!
Thursday, March 13, 2014
1st Marking period checklist
Update your Powerpoint with a conclusion slide of what you learned in the past 5 weeks.
Assignment:
1: Business Card
2: Multimedia Essay
3: Photoshop Filters
4: Postcard via Photoshop Layers
5a: Opacity
5b: Photoshop coloring with Fill function
5c: Black & White with color tints
6a: Gradient (chick)
6b: Gradient Creation (3 gradient options + 1 brush stamp)
6c: Cover for PowerPoint
Mid-Final: Powerpoint of assignment 1-6c
************ "Tutorial Board ***********
7: Glass Text Effect of your first name
8: Photo-filled text effect of your Last name
9: Plastic texture text effect of your Last name with Class of 20 _ _
10: Test "Crazy" text effect of your first name
Final Powerpoint Create & upload to your own blog.
March 13, 2014 - Happy 25 birthday to WEB!
Monday, March 10, 2014
10: "crazy" text Fx on your first name (Test) Due Wed 3-12-14
This is counted as the test for this Marking Period - No questions if you want 100% for the test.
Create A Crazy Text Effect Using Layer Styles
http://www.tutorialboard.net/create-a-crazy-text-effect-using-layer-styles/
8
In this tutorial we are going to create a cool text effect from ground up,by using layer styles and a couple of Photoshop filters to achieve a interesting cool looking effect. The text effect tutorials are covered many times by different tutors and Photoshop related websites but with layer styles the possibility’s are endless and mastering them is the key to your success to create unique designs.
Friday, March 7, 2014
extra credit
If you are not getting 100 on your assignment this your chance to get some extra points.
make a powerpoint or publish a paper on
----- the different Photoshop buttons we have used so far for our assignments.---- due Monday
What are the names and function of each button of the Photoshop tool bar? see answer1
more about tool bar...
make a powerpoint or publish a paper on
----- the different Photoshop buttons we have used so far for our assignments.---- due Monday
What are the names and function of each button of the Photoshop tool bar? see answer1
more about tool bar...
9: Plastic texture on your last name
in Photoshop after you open a NEW document: 6" x 4" with 100 resolution in RGB color mode
write your LAST NAME with your graduating class then follow the instruction to create this Plastic effect.
http://www.tutorialboard.net/plastic-text/How to make a Plastic Text in Photoshop
In this tutorial, we’re going to create a Plastic Text effect using layer styles one of the coolest features of Adobe Photoshop CS4, with layer styles we can create all sorts of effects glass, plastic, ice, water, metal, and many more so without losing any more time let’s get started. You can download the PSD file at the bottom of the tutorial if you’d simply like to copy+paste the layer styles.
if you are done updating your POWERPOINT you may get a early start on the TEST next week...
if you are done updating your POWERPOINT you may get a early start on the TEST next week...
Thursday, March 6, 2014
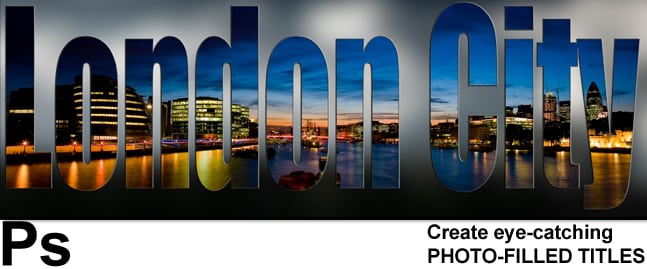
8: Photo-filled Last name
in Photoshop after you open a NEW document: 6" x 4" with 100 resolution in RGB color mode
Find a picture you like to be associated with your LAST name. save and open in PHOTOSHOP
Find a picture you like to be associated with your LAST name. save and open in PHOTOSHOP
Create eye-catching PHOTO-FILLED TITLES in Photoshop
In this easy to follow tutorial we are going to pull off a filling text effect with a image We are going to type text and use a clipping mask to clip the photograph so that it only shows through the letters. Because the letters are on an editable type layer, you can change the text even after the letters are filled with the image.
Write your Last name this time.Wednesday, March 5, 2014
7: Your first name in Glass text
More Blending Options fX

make a gradient back ground with multiple colors. I suggest just LINEAR gradient... but you can use other options if you like.
follow the instruction on http://www.tutorialboard.net/photoshop-glass-text-effect/ to complete your work. make sure you follow EVERYTHING, including the numbers in the figures.
Photoshop Glass Text Effect
Hello and welcome to another free Adobe Phtotshop tutorial, today we are going to create a Photoshop Glass Text Effect. We are going to demonstrate how you can achieve in just a couple of steps a Photoshop Glass Text Effect only using layer styles, also the PSD file is available for download to copy and paste the effect.
Tuesday, March 4, 2014
Club Fair After school Today at the Cafeteria
Homework time:
fill out your Info form ( get one from Miss Wang in class) in preparation for our flyer assignment.
Due tomorrow 3-5-14
********************* Mid Report Card check *************************
Please update your powerpoint to assignment #6c with summary.
save as 'Your name' 1st mark - progress report.PDF send in the email also due 3-5-14
Join a club today...
Go shopping for a club that you will like to join for the Spring semester.fill out your Info form ( get one from Miss Wang in class) in preparation for our flyer assignment.
Due tomorrow 3-5-14
********************* Mid Report Card check *************************
Please update your powerpoint to assignment #6c with summary.
save as 'Your name' 1st mark - progress report.PDF send in the email also due 3-5-14
Thursday, February 27, 2014
6 (a) Gradient Chick (b) your own creation (c) powerpoint cover!
What are the names and function of each button of the Photoshop tool bar? see answer1
more about tool bar...

6A: Explore Gradient tool - draw a gradient Chick
Open a new Photoshop file 6"x4" 100 resolution
click on the gradient tool with the "radial gradient" mode
then select the " foreground color to transparent mode"
choose "Yellow" for the body of the Chick
from the center of your canvas draw a radius to decide how big your Chick will be.
continue at this setting and change the color to WHITE to draw the eyes.
Change tool to brush and set the color to black and then dot the Iris/Pupil of the eyes.
Back to gradient tool and choose the "diamond gradient" to create the beak.
Draw in the missing feet with the brush tool.
Lastly choose the stamping option and choose #134 for the grass... (color of the grass can be set to green at this point).
Add text to complete the project.
Save as .PSD and .JPEG and send as attachment.
***************************************************************
6B: Create your own drawing using the gradient tools and stamping tools.
Use the other gradient tool options (3 out of 5)
and Stamping tool
Be creative!
**********************************************************************************************
6C: Cover for the powerpoint.
Open a new File with the following dimension 6" x 4" with 300 resolution in a white background.
Also make sure your foreground and background color are set to black and white color
goto Window menu and select layers to toggle the layer window
Duplicate the layer by right clicking the background layer.
goto Filter and choose Render --> FIBER set the Variance to 40 and Strength of 4
then another Filter choosing Blur --> Motion Blur with Angle of 90 and distance of 999
your pciture should have "streaks"
Goto Blending mode (by right clicking on the layer)
check gradient overlay of rainbow with 0 degrees
don't forget to overlay the gradient over the "streaks"
Finally, input the text of your name's 1st Marking Period Multimedia Portfolio TZS101-02,5,6,8 (choose your period) check off outer glow and others effects you like for the fonts.

save in .PSD and then .JPEG add as the first slide to your Powerpoint.
PDF the powerpoint and send in for the 50% of your report card :-) if you want 100% make sure its submitted by today!
more about tool bar...
6A: Explore Gradient tool - draw a gradient Chick
Open a new Photoshop file 6"x4" 100 resolution
click on the gradient tool with the "radial gradient" mode
then select the " foreground color to transparent mode"
choose "Yellow" for the body of the Chick
from the center of your canvas draw a radius to decide how big your Chick will be.
continue at this setting and change the color to WHITE to draw the eyes.
Change tool to brush and set the color to black and then dot the Iris/Pupil of the eyes.
Back to gradient tool and choose the "diamond gradient" to create the beak.
Draw in the missing feet with the brush tool.
Lastly choose the stamping option and choose #134 for the grass... (color of the grass can be set to green at this point).
Add text to complete the project.
Save as .PSD and .JPEG and send as attachment.
***************************************************************
6B: Create your own drawing using the gradient tools and stamping tools.
Use the other gradient tool options (3 out of 5)
and Stamping tool
Be creative!
**********************************************************************************************
6C: Cover for the powerpoint.
Open a new File with the following dimension 6" x 4" with 300 resolution in a white background.
Also make sure your foreground and background color are set to black and white color
goto Window menu and select layers to toggle the layer window
Duplicate the layer by right clicking the background layer.
goto Filter and choose Render --> FIBER set the Variance to 40 and Strength of 4
then another Filter choosing Blur --> Motion Blur with Angle of 90 and distance of 999
your pciture should have "streaks"
Goto Blending mode (by right clicking on the layer)
check gradient overlay of rainbow with 0 degrees
don't forget to overlay the gradient over the "streaks"
Finally, input the text of your name's 1st Marking Period Multimedia Portfolio TZS101-02,5,6,8 (choose your period) check off outer glow and others effects you like for the fonts.
save in .PSD and then .JPEG add as the first slide to your Powerpoint.
PDF the powerpoint and send in for the 50% of your report card :-) if you want 100% make sure its submitted by today!
Monday, February 24, 2014
5(a) Shapes with different Opacity and (b) color filling with (c) tints.
What are the names and function of each button of the Photoshop tool bar? see answer1
more about tool bar...
more about tool bar...
5A: Shapes with different Opacity due 2-24-14
in Photoshop choose ellipse shape tool to create circles of basic primary colors and set them in Opacity of 30%, 60% and 80%
(make sure your layer window is open, so you can see which layer you are working on).
send in .PSD and .jpg files... Update PowerPoint slide #5
*********************************************************************************
5B:Coloring Due 2-26-14
After you find a Coloring Page in Googles
in Photoshop use Magic Wand (4th button down on the tool bar) to select and then Fill with desired color.
(make sure your layer window is open, so you can see which layer you are working on).
save as 5B-Colored by your name.JPG after your save it as .PSD send both files to Miss Wang
Update PowerPoint slide #6
*********************************************************************************
5C: Coloring tinting a B & W photo Due 2-27-14
1. Look for a B&W photo. and open it Photoshop. (make sure your layer window is open, so you can see which layer you are working on).
2. right-click and choose > Duplicate layer> name this layer "color tint".
3. use the > "Magnetic Lasso" to choose the area you wish to tint. You must completely enclose the area by clicking to indicate when you want the magnetic lasso to end.
4. make a new layer for each color
5. > Edit> Fill> Color> adjust Opacity. Repeat until the subject is completely tinted.
6.then expand (use Canvas size) to set it as before and after. send final JPG to complete assignment.
save as 5C-BW-tinted by your name.JPG
Continue to update powerpoint. Update PowerPoint slide #7
*********************************************************************************
Please update your Powerpoint Folder with summary (due next week Fri). Mid report card check... How are you doing so far? still 100%?
*********************************************************************************
Thursday, February 13, 2014
Down your own LEGAL copy of the CS2 Photoshop
Snow Day: need access to Photoshop?
its Free because its a pretty old version, but at least its legal! and you can still get your assignments done :-)
https://www.adobe.com/cfusion/entitlement/index.cfm?e=cs2_downloads
https://www.adobe.com/cfusion/entitlement/index.cfm?e=cs2_downloads
Monday, February 10, 2014
4: Postcard (Photoshop Layers)
Part 1: making a collage
********************************************************************************* Due 2-12-14 ****
Step 1: Find 9 pictures online about your birthplace... save it in your folder.
********************************************************************************* Due 2-12-14 ****
Step 1: Find 9 pictures online about your birthplace... save it in your folder.
Step 2: Open Photoshop and create a new document [Ctrl+N]with the following specs.
6 " x 4" with 200 Resolution

Step 3: Open the a picture on the side and the do the following: Ctrl+A (select all) Clrt + C (Copy)
Step 4: Select the the Postcard document and Ctrl+V (Paste) your picture into the postcard.
Apply (Transformation) Ctrl+ T to adjust the size to fit.
Step 5: Save your collage as .PSD and .jpg ( what is .PSD?)
Apply (Transformation) Ctrl+ T to adjust the size to fit.
Step 5: Save your collage as .PSD and .jpg ( what is .PSD?)
*********************************************************************************************
2-13-14
Part 2: Adding a title banner in Photoshop
Step 6: Open another new file size W= 6" H=1" resolution with a
background color that contrast your collage.
...... like if your collage is mostly ocean blue you might choose red as a contrasting color.
Step 7: Select an opposite color to your foreground color then click on " T " for text to add your title
save as Title. JPG. close the file
Step 8: Open the Collage.PSD from Yesterday & the new Title .jpg - you should have 2 tabs now... copy the Title.jpg into the collage.
Step9: Use Magic wand (4th button down) to select the text and then Delete to let the collage show through....
Step 10: Send the final document with 10 layers as .PSD and JPG to complete this assignment.
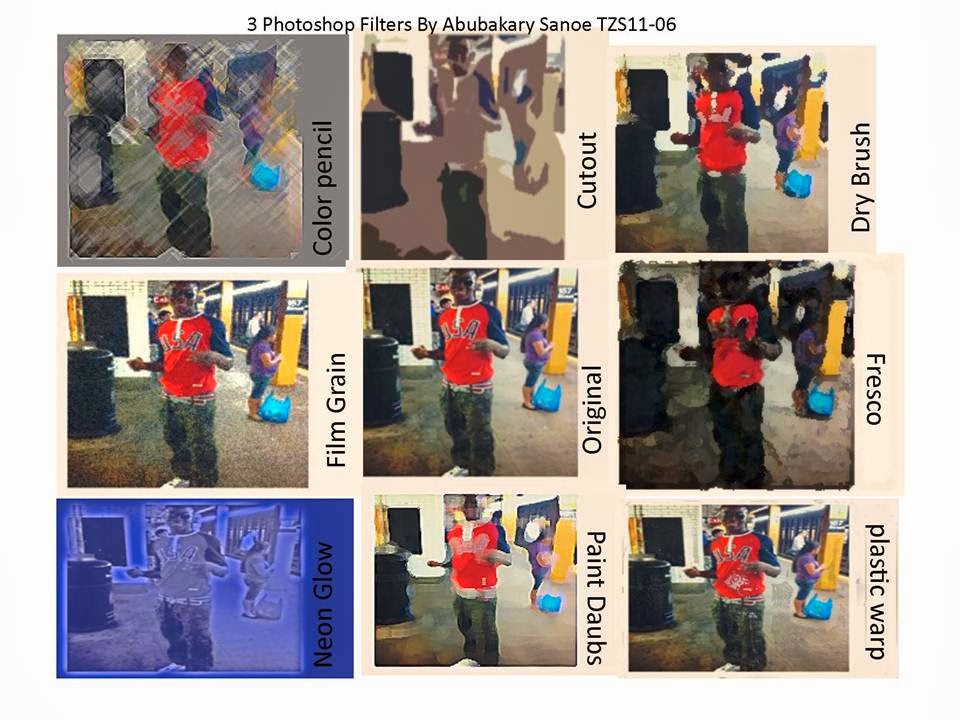
3: Photoshop filters (introduction to Photoshop)
First thing first
********************* Create a folder named TZS101-0? Your Name ****************************
drag your files into your folder
use the photo you have from the business card to do the following.
Open Adobe Photoshop from the menu open your photo apply filter save as the filter name
Step back [ctrl+Alt+z] to the original and repeat with another filter. (Repeat 7 more times... 1+7 = 8 filtered pictures in all)
you will have 8 different filtered effect photos at the end.
********************************************************************* Due 2-10-14 (email yourself)
Open up Publisher
select a blank page layout the page in a 3x3 format
Add a title "#3: Photoshop filters by you for Tzs101-0?"
place the original photo in the middle and rest of the 8 filtered photos around it.
add label all the photos on this page. and convert to PDF. (look up what & why we use PDF and email me your findings)
submit PUB & PDF via email then archive to PowerPoint as assignment #3 with summary on your PowerPoint.
********************************************************************************************* Due 2-11-14
Friday, February 7, 2014
2: Multimedia essay
day 3 & 4
Start on Task #2: Background research and write up on the PPPIGs. Due Friday
What is Multimedia to you? Quick research on the definition of Multimedia… provide examples.
Research and explain each Software that help create multimedia. - Microsoft Office: Publisher, Powerpoint - Adobe Photoshop, Illustrator - Google sketch Up - other programs… video editing APP
Careers that uses multimedia.
How will it be helpful in your future career goals ?
Tuesday, February 4, 2014
1: Business card made with Publisher
Learn to use the following software to create Multimedia Projects for your graphic communication needs.
Publisher, Powerpoint, Photoshop, Illustrator and Google sketch up and . PPPIGs
1st Task: Business card instead of the Delany Card
Find Publisher: open a new file and choose a Business card template.
Fill in the following information.
- Name
- Class of 2014, 2015, 2016 etc
- Most updated contact info like Phone#, address, email etc.
 - Your New Schedule.
this concludes our text element for this Multimedia Project.
HW: Computer lab contract signed and email your self a picture to complete this assignment.
***********************************************************************
Day 2: complete the assignment :adding the graphic element by inserting a picture, then save in .PUB and converted (save as) to .JPG for use in the PowerPoint.
Routine: send in your work as attachment(s) to mcsm3d@gmail.com
must have a subject line : TZS101-02 or which period you have multimedia. followed by your full name and the assignment # with description.
subject example TZS101-05 Your full name #1: business card
Once you send in your Task#1 you can archive it in PowerPoint. as slide #1 with a summary of what you learn from making your business card. save your work by emailing yourself the PowerPoint.
*****************Save your Powerpoint as Your name 1st marking period*********************
if you are done you may move on to...day 3 & 4
Start on Task #2: Background research and write up on the PPPIGs. Due Friday
Quick research on the definition of Multimedia… provide examples. Software that help create multimedia. - Microsoft Office: Publisher, Powerpoint - Adobe Photoshop, Illustrator - Google sketch Up - other programs… video editing APP Careers that uses multimedia. Will it be helpful in your future career goals?
Publisher, Powerpoint, Photoshop, Illustrator and Google sketch up and . PPPIGs
1st Task: Business card instead of the Delany Card
 instead of
Find Publisher: open a new file and choose a Business card template.
Fill in the following information.
- Name
- Class of 2014, 2015, 2016 etc
- Most updated contact info like Phone#, address, email etc.
- Your New Schedule.this concludes our text element for this Multimedia Project.
HW: Computer lab contract signed and email your self a picture to complete this assignment.
***********************************************************************
Day 2: complete the assignment :adding the graphic element by inserting a picture, then save in .PUB and converted (save as) to .JPG for use in the PowerPoint.
Routine: send in your work as attachment(s) to mcsm3d@gmail.com
must have a subject line : TZS101-02 or which period you have multimedia. followed by your full name and the assignment # with description.
subject example TZS101-05 Your full name #1: business card
Once you send in your Task#1 you can archive it in PowerPoint. as slide #1 with a summary of what you learn from making your business card. save your work by emailing yourself the PowerPoint.
*****************Save your Powerpoint as Your name 1st marking period*********************
if you are done you may move on to...day 3 & 4
Start on Task #2: Background research and write up on the PPPIGs. Due Friday
Quick research on the definition of Multimedia… provide examples. Software that help create multimedia. - Microsoft Office: Publisher, Powerpoint - Adobe Photoshop, Illustrator - Google sketch Up - other programs… video editing APP Careers that uses multimedia. Will it be helpful in your future career goals?
Tuesday, January 7, 2014
Welcome to Spring Semester of Multimedia
Learn to use the following software to create Multimedia Projects for your graphic communication needs.
Publisher, Photoshop, Powerpoint, Illustrator and Google sketch up and . PPPIGs
Publisher, Photoshop, Powerpoint, Illustrator and Google sketch up and . PPPIGs
Subscribe to:
Posts (Atom)