Monday, February 23, 2015

5: a, b, c, exploring PS buttons - Gradient, Shapes, Paint Bucket and Opcacity

REMINDER: Parent communication due

What are the names and function of each button of the Photoshop tool bar? see answer1 
more about tool bar...


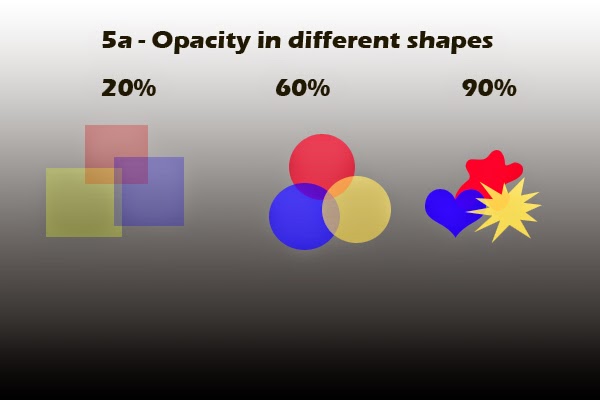
5A: Shapes with different Opacity
                                    due 2-23-15
Create a NEW file 6" X 4" 100 Resolution with a Gradient background.. see example-->
in Photoshop choose rectangle, ellipse and custom shape tool to create shapes of basic primary colors and set them in Opacity of 20%, 60% and 90%
(make sure your layer window is open (F7), so you can see which layer you are working on).

send in .PSD and .jpg files... Update PowerPoint slide #5
*********************************************************************************
5B:Coloring Due 2-24-15
After you find a Coloring Page in Googles
in Photoshop use Magic Wand (4th button down on the tool bar) to select and then Fill with desired color.(other option is to use the paint bucket button). 5 different colors minimum...
(make sure your layer window is open, so you can see which layer you are working on).

Now expand your CANVAS SIZE (under Image) by doubling the width of the original file. click the base square box to the right so the CANVAS will expand to the left.

Copy & Paste original image next to the colored one. Add title and
save as 5B-Colored by your name.PSD then save it as .JPG

send both files to Miss Wang
Update PowerPoint slide #6
 *********************************************************************************

5C: Coloring tinting a B & W photo Due 2-26-15

1. Look for a B&W photo. and open it Photoshop. (make sure your layer window is open, so you can see which layer you are working on).

2. right-click and choose > Duplicate layer> name this layer "color tint".

3. use the > "Magnetic Lasso" to choose the area you wish to tint. You must completely enclose the area by clicking to indicate when you want the magnetic lasso to end.

4. make a new layer  for each color

5. > Edit> Fill> Color> adjust Opacity. Repeat until the subject is completely tinted.

6.then expand (use Canvas size) to set it as before and after. send final .PSD & .JPG to complete assignment.

save as 5C-BW-tinted by your name.JPG

Continue to update powerpoint. Update PowerPoint slide #7


*********************************************************************************

Please update your Powerpoint Folder with summary (due next week Fri). Mid report card check... How are you doing so far? still 100%?
*********************************************************************************

Friday, February 13, 2015

* Parent communication #1 - signature required

Update your Power point to slide # 4 with summaries.

Print them out on 1 sheet of paper only...

make sure its send to the printer LEXMARK T 640

go to print and set it to HANDOUT... choose 4 slides per page.


write your name and class on it... show it your parents and tell them what you learned in Multimedia.

make sure they sign it to acknowledge your accomplishment... have a good break, see you in 10 days.


Wednesday, February 11, 2015

4: Postcard via layers...due 9-22-15

Part 1: Make a Title banner in Photoshop

Step 1: Open Photoshop: in the menu bar goto NEW and set 
a new file size W= 6" H=1" resolution 200 
                                                     with a background color that contrast your Title

Step 2: Select an opposite color to your foreground color then click on " T " for text to add your  Birthplace/ethnicity  title  save as Title. JPG. close the file. 

**********************************************************
Part 2: Making a collage...

Step 3Find 9 pictures online about your birthplace... save it in your folder.

Step 4: Open Photoshop and create a new document [Ctrl+N] with the following specs. 
6 " x 4" with 200 Resolution


Step 5: Open the a picture on the side and the do the following: Ctrl+A (select all) Clrt + C (Copy)


Step 6: Select the the Postcard document and Ctrl+V (Paste) your picture into the postcard. 
            Apply Ctrl+ T (Transformation)  to adjust the size to fit. 

Step 7: Save your collage as .PSD and .jpg ( what is .PSD?)


********

Step 8: Open the Title .jpg from Yesterday & the new Collage.PSD -  you should have 2 tabs now... copy the Title.jpg into the collage.


Step9: Use Magic wand (4th button down) to select the text and then Delete to let the collage show through....

Step 10: Send the final document with 10 layers as .PSD and .JPG to complete this assignment. 


see example by Alfa...

Tuesday, February 10, 2015

3b: Publisher flyer of Photoshop filtered photos


Open up Publisher 

select a blank page layout  the page in a 3x3 format  
Add a title "#3: Photoshop filters by you for Tzs101-0?"

place the original photo in the middle and rest of the 8 filtered photos around it. 

add label all the photos on this page. and convert to PDF. (look up what & why we use PDF and email me your findings)

submit PUB & PDF via email then archive to PowerPoint as assignment #3 with summary on your PowerPoint.
********************************************************************************************* Due 9-18-15

 if submit your #3 (.pub & .pdf) via email to mcsm3d@gmail.com
and you are done updating your Powerpoint to slide #3 Photoshop Filter Flyer
 with what and why .pdf

#4: Postcard ---> http://tzs101.blogspot.com/2014/02/4-postcard-photoshop-layers.html

Join ACE mentor...

go to ACE mentor or see Miss Wang for more info.

Every Wednesday at Columbia from 4pm to 6pm....
share what you are learning there for extra credit too :-)

http://www.acementor.org/students/

Monday, February 9, 2015

3: Photoshop Filter Photos

see where Instagram got its idea...

In this assignment we will be using Photoshop to filter your selfie, then publish your work in a blank flyer in Publisher.


First thing first 
********************* Create a folder named TZS101-0? Your Name ****************************
                                                                                                drag your files into your folder


use the photo you have from the business card to do the following. 

1. Open Adobe Photoshop 
2. from the menu FILE --> OPEN your photo 
3. FILE --> FILTERS apply filter save as the filter name 
                                                          example colored pencil.jpg

4. Step back [ctrl+Alt+z] to the original and repeat with another filter. (Repeat 7 more times... 1+7 = 8 filtered pictures in all)

you will have 8 different filtered effect photos at the end. (not including the original).
********************************************************************* Due 9-17-15 (email yourself)


2: What is Multimedia essay

Learn to use the following software to create Multimedia Projects for your graphic communication needs.
Publisher, Powerpoint, Photoshop, Illustrator and Google sketch up and . PPPIGs

when you are done you may move on to...day 3 & 4
Start on Assignment #2: Background research and write up on the PPPIGs. Due Friday
Suggested layout of your essay...

paragraph 1: Quick research on the definition of Multimedia… provide examples. 

paragraph 2:Software that help create multimedia. - Microsoft Office: Publisher, Powerpoint - Adobe Photoshop, Illustrator - Google sketch Up - other programs… video editing APP 

paragraph 3:Careers that uses multimedia. Will it be helpful in your future career goals?


update your Powerpoint to slide #2 with your essay.


Tuesday, February 3, 2015

Welcome to Multimedia - get 1 Tech credit on your transcript

1: Business card made with Publisher

Learn to use the following software to create Multimedia Projects for your graphic communication needs.
Publisher, Powerpoint, Photoshop, Illustrator and Google sketch up and . PPPIGs

1st assignment: Business card instead of the Delany Card

Find Publisher: open a new file and choose a Business card template.
Fill in the following information.
- Name
- Class of 2014, 2015, 2016 etc
- Most updated contact info like Phone#, address, email etc.
- Your New Schedule.
this concludes our text element for this Multimedia Project.
HW: Computer lab contract signed and email your self a picture to complete this assignment.
***********************************************************************

Day 2: complete the assignment :adding the graphic element by inserting a picture, then save in .PUB and converted (save as) to .JPG for use in the PowerPoint. 

Routine: send in your work as attachment(s) to       mcsm3d@gmail.com
must have a subject line : TZS101-02 or which period you have multimedia. followed by your full name and the assignment # with description.
subject example TZS101-05 Your full name #1: business card

Once you send in your assignment#1 you can archive it in PowerPoint. as slide #1 with a summary of what you learn from making your business card. save your work by emailing yourself the PowerPoint.
*****************Save your Powerpoint as Your name 1st marking period*********************


if you are done you may move on to...day 3 & 4
Start on Assignment #2: Background research and write up on the PPPIGs. Due Friday

Quick research on the definition of Multimedia… provide examples. Software that help create multimedia. - Microsoft Office: Publisher, Powerpoint - Adobe Photoshop, Illustrator - Google sketch Up - other programs… video editing APP Careers that uses multimedia. Will it be helpful in your future career goals?