Miss Wang is at Jury Duty this week...
http://tzs11.blogspot.com/2014/01/wrap-up-for-1st-semester-1-elective.html
make a brochure of your FALL schedule.. you need the picture of the text book or the software used in your class. plus a short description of what you've learned in each period.
see sample below ( finish 2 panel out of 6 everyday) Due Friday.
page 1
page 2
Multimedia 2015
Monday, January 18, 2016
Wednesday, January 6, 2016
25: Animation Button (due Friday)
In Animation : Bonus have your name light up... use the same instruction and alter to make your name glow!
this marking period use (blue color, not red) DUE Jan 8, 2014
goto http://www.photoshop-plus.co.uk/2011/10/05/learn-how-to-create-a-simple-glowing-animation/
Day #1: creating the button with Aluminum effect.
Day #2: Grouping and adding the green glow
Day #3: Animating the on and off button
this marking period use (blue color, not red) DUE Jan 8, 2014
goto http://www.photoshop-plus.co.uk/2011/10/05/learn-how-to-create-a-simple-glowing-animation/
Day #1: creating the button with Aluminum effect.
Day #2: Grouping and adding the green glow
Day #3: Animating the on and off button
Learn How To Create A Simple Glowing Animation
Photoshop is a powerful tool, not only does it have the ability to edit and manipulate photos it also has the ability to animations. In this tutorial I’ll be walking you through the process of creating a simple animated glow effect. =)
next #26 showcase your phone or your favorite thing. (3 different views - front, back and side) Link:
Monday, January 4, 2016
23 & 24: Gingerbread house
24: creating a 3d viewing of your gingerbread house
Back to Photoshop!
By separating the RGB channels - red and blue to be exact, to create the illusion of "3D" click the picture for instruction. Due 1-5-16
#23: Gingerbread house
Post the original picture to your blog so you have your own online handout...
when you are done please export the front ISO and back ISO and
put them together using Photoshop with label
that's it for for 2015.... see you in 2016!Tuesday, December 8, 2015
22: 3D blocks #1-12
22: count each "diamond" box as 1 foot
recreate each of the following blocks with the correct measurement.
12/8/15 = block # 1 ... 12/9/15= block # 2... 12/10/15 = block # 3... 12/11/15 = Block # 4
12/14/15 = block # 5 &6 ... 12/15/15 = block # 7 & 8...
12/16/15 = block # 9 & 10... 12/17/15= block # 11 & 12
12/18/15 QUIZ => Quiz email to mcsm3d@gmail.com
you may want to save this diagram on your desktop "count" the "Diamonds" easily. ask for a hard copy if that's easier for you.
go under window and click on instructor if you get stuck with a tool button.
getting the precise measurement:
after you set the view needed to draw the face of the block. click on line tool and then type in the dimension box (lower right corner) to type in the desired measurement. For example if you want a vertical line that is 5 feet tall, then type 5' (' = feet).
(click on a starting point and move your mouse towards the direction you want the line to draw...then type the measurement. like block #1 =LxWxH of 8'x 5'x5')
Monday, December 7, 2015
3rd marking period - Google Sketch UP (3D)
Now we are done with graphic design (illustrator) and photo edit (Photoshop)
we will be trying out what software the Engineers might use in their job.
3rd marking period
#21 a b c (due today) answer these question in your blog
3D CUBE has how many sides? list them
(L x W x H ) what color lines (axes) is used in the software to represent them?
we will be trying out what software the Engineers might use in their job.
3rd marking period
#21 a b c (due today) answer these question in your blog
3D CUBE has how many sides? list them
(L x W x H ) what color lines (axes) is used in the software to represent them?
Introduction to Google Sketch Up .... you can download your own version! Google SketchUp
----->V............Look for the red staircase on your desktop
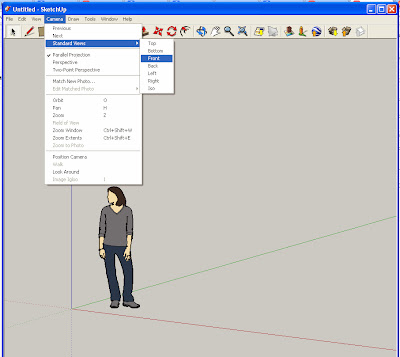
Assignment 21 A: Set the screen to front view &
Practice with the basic tools. Export to JPG to upload into the blog.
set in front view then draw the shapes #21A followed by the "push & pull" tool for the 3D Objects #21B
Now you ready to try and draw your own name in "bubble letter" for #21C
when you are done email all files .skp & Jpeg
with the correct subject:
TZS11-02,5,6,8 Your Period / Name #21 a b and c
Wednesday, December 2, 2015
Parent communication # 6 - and wrap up test questions.
#20 Wireless Phone (test) due 12-2-15 last day of the marking period
When you are done with the test you can work on the extra credit living room ...
email jpg daily and post on blog...
day 1 - Step 1 to 8 (test on shapes, gradient and stroke)
day 2 - Step 9 to 19(test on more shapes grouped and pathfinder functions)
last week of marking period
day 3 - Step 20 to 28(Buttons and labels)
day 4 - Step 29 to 32(add mic and speaker)
day 5- extra credit Phone base (step 33 to 40) and update blog ( print out Parent Communication #6 get signature due by Friday.)
answer the following questions.
In this phone test I showed...
about day 1- what shapes did you make on day 1 and what treatment did you add to these shapes. How did you create a "smaller copy"?
about day 2 - what pathfinder tools did you use with the different shapes to create the function buttons.
about day 3 - more buttons were created. the round menu button and the number key pad... what function was used to created the gradient ring? how did you "copy" the other number keys after the first one?
about day 4 - to give the illusion of a depressed speaker we created this _____ to redefine the topography of the OVAL. then we use the _____ shape(s) to create a mic for this phone.
what parts of the test did you have to ask Miss Wang? what did you do to solve the problem?
last week of marking period
day 5- extra credit Phone base (step 33 to 40) and update blog ( print out Parent Communication #6 get signature due by Friday.)
answer the following questions.
In this phone test I showed...
about day 1- what shapes did you make on day 1 and what treatment did you add to these shapes. How did you create a "smaller copy"?
about day 2 - what pathfinder tools did you use with the different shapes to create the function buttons.
about day 3 - more buttons were created. the round menu button and the number key pad... what function was used to created the gradient ring? how did you "copy" the other number keys after the first one?
about day 4 - to give the illusion of a depressed speaker we created this _____ to redefine the topography of the OVAL. then we use the _____ shape(s) to create a mic for this phone.
what parts of the test did you have to ask Miss Wang? what did you do to solve the problem?
Subscribe to:
Posts (Atom)